Metal Fencing Repair
Metal fences like wrought iron can be expensive to repair when they have suffered severe weather damage. A professional may have to weld the broken sections back together or patch them. Fencing Companies Rock Hill SC will also need to sand, clean, and repaint the area.
 Preventing rust and keeping the fence clean will keep the cost down. Repairs are usually charged per linear foot, and certain repairs or areas require a higher labor cost. The backbone of your fence, posts, are often the first to experience issues. They can shift in the ground due to weather or settle unevenly causing sags and droops in the aluminum or steel fencing.
Using a level, check the post to ensure it is plumb (vertical). If it’s off by even a little bit, you can brace the post with a scrap piece of two-by-four screwed into place. With an assistant, push the post upright and make sure it is straight with a bubble level. Once you’re certain the post is secure, fill the soil void around the post with concrete to prevent water from pooling and rotting the base.
A metal fence may also have a bent post that can’t be repaired, either because someone tried to gain access or because of the way it was installed. In this case, a professional should be called to replace the post.
If your post was set in concrete, remove the old concrete from the hole using a sledgehammer and shovel. Then set a new concrete footing around the post using a bucket of mixed half-wet sand and half small gravel, packing the mixture tightly. If the fence was set in sandy or rocky soil, use stay wire to act like bracing for the post.
Alternatively, you can use an EZ mender to repair the leaning post in your metal fence. The EZ mender is a long metal rod with pre-drilled holes in it, which you screw into the hole where the post was located. Once the EZ mender is in, you can use the tip of a sledgehammer to pound it into the concrete and tamp down the end of the EZ mender.
If you have a chain link fence, a bent post can be one of the most challenging problems to fix. You’ll need to re-establish the chain link fabric, so find two points of fabric on each side of the damaged area and untwist them with linesman’s pliers. Then measure a slightly longer replacement section, and install it by twisting the end of the new chain link wire into the top and bottom of the existing rails and then using wire ties to reattach it.
Repairing a Gate
A metal fence gate is more than just a passageway to your property; it is also an attractive feature. If your gate is damaged or rusty, it can be a big eyesore that makes the whole fence look less than great. Fortunately, you can usually repair the gate without replacing it, and it is often cheaper to do so than to replace the entire fence.
Most gates are made of either steel or wrought iron, and these materials are very durable. However, even the best-built gates can suffer from damage and rusting. Fortunately, you can often fix these problems by welding and repainting. A professional will usually charge a few hundred dollars to repair a gate, but you can save money by doing the work yourself.
If your gate hinges are squeaky or sticky, you can try lubricating them with WD-40. You can also add lubricant to other moving parts of the gate on a regular basis to keep them working smoothly. If these techniques don’t solve the problem, you may need to replace the hinges or latches.
Rust is the nemesis of iron and wrought iron fences, and it’s important to address rust quickly. The first step is to remove the rust, which can be done by wire brushing or sanding the affected area and removing any debris. Next, the area is patched and coated in a rust-resistant primer. Finally, the fence is repainted.
Aluminum and wrought iron fences don’t rust, but they can be damaged by heavy precipitation or salt water. The good news is that both aluminum and wrought iron can be repaired with welding. However, a full restoration will cost significantly more than repairing or painting a fence.
Wrought iron is a historic style of fencing, and it typically costs between $30 and $50 per linear foot to restore. This process can include sandblasting, spot welding, cleaning and repainting. Repairing a fence that is made of wrought iron can be more complicated than repairing one that is made of aluminum. This is because wrought iron can be easily broken if the welded areas aren’t done correctly.
Repairing a Rail
Over time, metal fence rails can loosen or break. Some can be repaired by spot welding, patching and rust removal, while others may need to be completely replaced. Depending on the material, this could involve cutting off and welding on new solid steel or tubular steel rails for an aluminum fence or sawing off and welding on a replacement section for a wrought iron fence. A professional will charge by the hour to weld a new section or piece of fence, and prices vary by location.
Chain link fences are most common, but even wood, vinyl and wrought iron fencing can break due to age or weather. Repairing broken sections can be tricky, so it’s best to hire a professional. Labor is usually charged by the hour, but specialized repairs like rust removal or replacing a panel can increase costs.
A broken rail can be a real eyesore. To replace it, first remove the wire ties connecting the top of the chain link mesh to the rail. Using pliers, loosen the ties and then use a reciprocating or hacksaw to cut off the existing section of rail. Next, purchase a new rail at a home improvement store that matches the length of the old one. The new rail should have one tapered end and one wider end for attaching to the existing fence. Mark the new rail where it will fit into the existing fence, and then cut it with a reciprocating or hacksaw.
If the damaged section of fence is just bent, it might be possible to hammer it back into place. However, if it is warped or broken beyond repair, it’s usually more cost-effective to simply replace it. It’s a good idea to check out your local home improvement stores for options, as many have both metal and vinyl fencing available. They can also help you find a matching color for your replacement section. For a newer look, you can also consider painting the entire fence.
Repairing a Section
If a section of your metal fence is damaged by weather, critters or even vandalism it may need to be replaced. A pro can do this for you or you can try it yourself. You will need to know the dimensions of your damaged area to purchase the right length of fencing fabric. This can be done by measuring the distance between the post and end of the fence or using a tape measure to determine the actual size of the damaged section of fence.
If the damage is severe it may be necessary to replace a full panel. This will cost more but it is often the only option. This is also true if a portion of the fence has been completely destroyed by wind or other forces.
When repairing a section in a chain link fence you will need to remove the old wires from the rail. To do this you will need a pair of linesman’s pliers and the right length of new fencing. You will need to remove the old wire ties that were holding it to the top and bottom railings, then cut the other end of the old fencing and slip on a coupling sleeve. This will join the ends of the old and new fencing and allow you to run your hand between them without getting snagged on any wires. Now you can attach the new fencing to the rails by using the old wire ties that were there.
A good tip to remember is that when welding any metal it’s always best to work in an open area and be sure nothing flammable is nearby. It’s also important to wear the proper safety equipment such as a welding helmet and gloves.
Another thing to keep in mind is that if your home owners insurance covers your fence repairs it will need to be documented before the repair starts. Documentation can be as simple as filling out a form but it’s important to do this. This way if something goes wrong during the repair process you will have documentation that will prove what was done and what the costs were. It’s important to find a reputable contractor for any type of repair to ensure the job is done correctly.
Essential Tools For a Handyman
Handyman Naperville IL takes on everything from repairing leaky faucets to de-cluttering basements. However, the success of your business depends on having the right tools and a solid plan for getting paid.
 It’s also important to understand your state’s handyman rules and regulations. Doing so can save you a lot of headaches and fines from investigators and contractor boards.
- Circular Saw
A circular saw is one of the most versatile power tools that can be used for a wide variety of DIY projects. Handymen often use this tool to make straight cuts in wood, plastics, metals and other materials like concrete or bricks. This tool is easy to operate and can be used on a table or floor. It can be powered by either a cord or a battery, depending on the model you have.
When using a circular saw, it’s important to properly prepare the material before cutting it. This will ensure that you get a quality cut and protect yourself from injuries. First, set the depth of the blade to be slightly more than the thickness of the material. This will prevent the blade from getting stuck in the material and causing a dangerous kickback. Next, clamp or screw the material in place and make sure that it’s as stable as possible. Some professionals even use a sawhorse to help keep the material steady and prevent it from moving as they cut.
Finally, make sure that the line that you’re going to cut is clearly marked. You can do this by marking the desired cut location with a framing square and then drawing a dark straight line on the board. It’s also a good idea to use a tape measure to check the accuracy of your marks.
Once you’re ready to start the cut, position the base plate of the saw over the mark and then slide the blade into place. It’s important to remember that a circular saw can only cut straight lines, so you should carefully guide it along the marked line. Be careful not to apply too much pressure, as this could burn up the motor. Once the cut is complete, remove the blade and put the saw down.
- Fish Tape
Fish tape is a tool that helps when you need to pull wires through walls, conduits and other tight spaces. It helps with electrical, data and even ethernet cable runs. There are several types of fish tape including fiberglass, steel and non-conductive varieties that can be used in different environments. There is also a range of lengths available from 50 to 200 feet, depending on your project needs.
Basically, it works by having a hook on the end that you feed into the wall or conduit. Then, you can connect the end of your new wiring to the hook and slowly reel it in. The tape will help to guide your new wires through the existing hole in the wall or conduit run. The most common type of fish tape is made from stainless steel and has a plastic reel that it is stored in, but you can find non-conductive fiberglass varieties.
A good quality fish tape is usually durable and easy to use. It can be used for many projects and is a must-have tool for any handyman to have. However, it is not indestructible and can get damaged by other materials such as insulation, firestops, pipes, HVAC ducts and other obstructions that can clog the hook.
When choosing a fish tape, the most important consideration is its tensile strength and length. Some have sequential foot markings that make it easier to pull wires and measure distance, while others have gripping handles with slip resistance for comfort. If you have a tough jobsite, a high-quality steel or fiberglass fish tape is a reliable choice. It is also worth considering non-conductive varieties for working around sensitive electrical systems.
- Electrical Tape
Electrical tape is made to insulate and protect wires and other materials that conduct electricity. Handymen often use it to splice or connect electrical cords and cables, but it’s also helpful for other types of wiring jobs. Electrical tape is usually thicker than traditional tape and has a rubber-based adhesive that’s designed to hold up in extreme temperatures. It also has an elastic backing that allows it to stretch and conform to the object you’re wrapping, ensuring that all the edges are sealed and insulated.
When choosing electrical tape, it’s important to know what kind you need for your job. You can choose from a variety of colors, each of which has a specific meaning, such as black to indicate a ground wire or blue to mark high voltage areas. You can also find striped electrical tape, which is useful for identifying adjacent wires that supply separate power sources. Other types of electrical tape are available with spaces for marking numbers, which can help identify the voltage level and phase of a cable (also known as phasing tape).
The best type of electrical tape to buy depends on your needs. If you’re buying tape for a light wiring fix or moderate wire insulation job, standard vinyl electrical tape should work fine. However, if you need tape that resists moisture and extreme temperature changes, you’ll need to look for a high-grade electrical tape. Make sure that the tape you select has a polymeric or monomeric backing and is UL-listed or CSA-approved. Also, remember that it’s best to half-lap electrical tape when applying it, which doubles the thickness of the application and enhances its insulation. When half-lapping, start by winding the tape a little ahead of the point where the outer covering begins to split on an extension cord and continue around the cord, overlapping each new layer by half.
- Tape Measure
A tape measure is one of the most essential tools that every handyman should have. It allows you to quickly and easily measure the length of an object or distance between objects. You can find a wide range of tape measures available in different lengths and designs, but all have similar features. Here are some of the key components of a tape measure:
The case, also known as the housing, is the holder for the coiled tape and can be made from metal, plastic or a durable rubber that’s been drop tested to ensure it can withstand rough use on the job site. The hook at the end of a tape measure (also called the tab, tang, latch or lip) serves several purposes. It helps you remove the tape from its housing, keeps it from disappearing inside when it recoils, and lets you take inside measurements without having to bend the tape.
Most tape measures display their measurements in inches on the blade with smaller divisions that represent fractions of an inch. The number of one-inch marks on a tape measure will depend on its length; for example, a 16-foot tape measure may have sixteen one-foot marks because 12 inches equals a foot.
You’ll also find that some tape measures have metric markings on the bottom of the blade, which are measured in centimeters and millimeters. The smallest line on the tape measure indicates millimeters, while the longest line indicates meters.
If you’re looking for a great gift for your favorite handyman, consider giving them this custom Handyman Locking Tape Measure from Promotional Product Inc. It features a locking mechanism that keeps the tape measure in place so it doesn’t retract accidentally and a belt clip on the back to help keep it handy. Plus, it’s proudly printed in the USA to support local jobs.
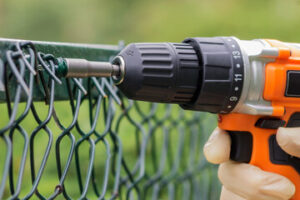
- Cordless Driver
Handymen need a good selection of power tools to complete their work as quickly and efficiently as possible. A cordless driver is one of these essential pieces of equipment as it allows the handyman to screw in items without having to deal with a cumbersome drill and cable. There are a number of different types of cordless drivers available on the market, with some offering greater torque and speed than others. The most useful type of cordless driver for a handyman is likely a cordless combi drill which has a hammer action that allows it to penetrate tougher materials as well as drilling and driving screws.
Handyman images recur in popular culture, with many songs about the occupation recorded by artists including Elvis Presley and Del Shannon. There are also a number of television shows that feature handymen such as Home Improvement and Mister Rogers’ Neighborhood. A character on the children’s show The Smurfs named Handy Manny wears traditional handyman accoutrements, such as overalls and a carpenter’s pencil.
There are also a number of websites that offer a service whereby potential clients can be put in touch with local handymen within their geographical area. Handymen often work independently or as part of larger firms that specialize in providing this type of service.
How Much Does Radon Testing Cost?
Radon is a colorless, odorless gas that can leak into homes through cracks and gaps. It is produced naturally by the decay of certain types of soil and rock.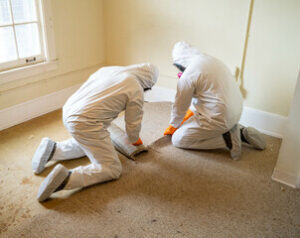
Home inspection companies often offer Radon Testing Colorado Springs as part of their full service offerings to buyers. There are a number of different types of radon testing available.
Radon is a naturally occurring radioactive gas that has been linked to lung cancer. It comes from the soil and moves into the air in homes through cracks in the foundation, gaps around electrical and plumbing penetrations, or openings in walls and floors. Once in the home, radon gases are trapped and can build up to dangerous levels over time. It is important for every homeowner to test their home for radon. If a home is found to have high levels of radon, a radon mitigation system can be installed to lower the concentration.
A radon inspection involves the certified home inspector using one or more devices to assess current radon levels in the soil, air, and water. These devices are based on technology that uses electromagnetism to detect particles of radon in the air. They include electret ion detectors, alpha track detectors, and charcoal canister tests. These devices are small and easy to use. The EPA requires that all radon testing be conducted under closed-house conditions, so all windows and exterior doors are shut except for those used for normal entry and exit, and that attic fans, dehumidifiers, and kitchen and bathroom fans are not running during the duration of the test.
When a test is performed, the device is placed in the lowest livable level of the home, usually a basement, and left in place for the time instructed on the test kit. A short-term test generally takes 2 to 90 days, while a long-term test may take up to a year. It is recommended that you perform a radon test before purchasing a new home, especially if it is located in a high-risk area. The EPA provides a radon map that details radon zones by state and county.
Even a well-maintained, newer home can have an actionable radon level. Homeowners should consider radon testing any time they make changes to the living environment, including finishing or adding on to the home. Likewise, if you are thinking of selling your home, the EPA recommends adding a professional radon test to your pre-sale home inspection. This allows you to negotiate for radon abatement or adjust the sales price before closing the deal.
Why It’s Important
Radon is a dangerous gas that can enter homes and cause lung cancer. It’s important to test for it, especially if you’re considering buying or selling your home.
Luckily, radon testing is relatively inexpensive and fast. It’s also negotiable, which means either the seller or the buyer can pay for it as part of the home inspection process. Since radon is a silent, intangible risk, it’s important to get the test done as quickly as possible so that you can make an informed decision about whether or not to move forward with your transaction.
The EPA estimates that radon is responsible for 21,000 lung cancer deaths in the states every year. That’s an awful lot of people. While most homeowners understand that having a thorough home inspection is crucial before purchasing a home, not everyone thinks about radon testing.
Depending on the type of test, either a professional inspector or a homeowner can conduct it. If you do the test yourself, make sure to follow all of the instructions carefully to ensure that you get an accurate reading. The home should be empty for the duration of the test, and windows should be closed. Running devices such as fans or air conditioners can also interfere with the test.
In addition to being tested during a real estate transaction, radon should be tested regularly in any home. The EPA recommends that you get your home tested once a year, or whenever there’s a major change in the living conditions of your house.
It’s important to note that the results of a radon test can vary greatly from home to home, even in homes located in the same neighborhood. This is porque the underlying geology of diferentes areas can have an impact on radon levels.
In addition, radon levels can rise and fall depending on the season, so it’s essential to do multiple tests over time. Short-term radon tests are the most common, but you can also opt for longer-term kits that measure radon for over 90 days to provide a more accurate picture of the average level in your home.
Types of Devices Used
Radon testing devices are either active or passive. Passive devices require no external power source to function and include charcoal canisters, alpha track detectors, and charcoal liquid scintillation detectors. These devices are exposed in the building for a period of time, usually for two to 90 days, and then sent to a lab for analysis.
The most common radon testing device is the charcoal canister. The canister has a charcoal filter that absorbs radon for the duration of the test. A home inspector or certified radon tester will take the canister and its contents back to the laboratory for analysis. The results will show the concentration of radon gas in parts per million (pCi/L).
Other passive devices that can be used for short-term or long-term testing include electro-ion chamber detectors and SMART meters. EICs have a passive ionization chamber that is filled with positive and negative ions that are derived from the decay of radon and its products. Radiation emitted from these particles ionizes the air within the device, and an electret sensor measures the discharge in volts over a known interval. This value, in conjunction with a duration and calibration factor, relates to the concentration of radon in parts per million.
SMART meters are similar to EICs, but they do not require a battery. They also measure humidity, which can affect the performance of some passive devices. SMART meters also monitor barometric pressure and temperature changes in the test building, which can indicate attempts to tamper with the measurement, such as opening windows or running ventilation systems.
Although grab samples can be useful in determining whether a mitigation system is needed, they are not recommended for assessing the risk of radon exposure or making decisions regarding remediation. Grab samples are collected by various devices like scintillation cells over time intervals as short as a few minutes and then sent to the laboratory for analysis. They are not designed to be tamper-proof.
When performing a short-term or long-term radon test, it is important to follow all directions on the testing kit. Generally, this includes closing all doors and windows except for those normally used for entry and exit. Other guidelines may include not operating furnaces, fireplaces, or any other ventilation systems during the test. The best option for a long-term radon test is to perform an annual average exposure test, which can be performed in addition to a shorter-term test or on its own.
Cost
Whether you hire a professional or use a do-it-yourself test kit, the cost of radon testing depends on how many tests you want and which type of equipment is used. Some companies charge a flat fee for a basic home inspection, which includes radon testing. If the house is larger or in a remote location, the company may also charge a travel fee.
Most homebuyers have heard that they should have a home inspection done before closing on the property, but many don’t realize it’s also important to have radon testing conducted as well. This way, the potential buyers will know if they’re buying a home with a radon problem and can work with the seller to negotiate.
Whether a radon test is being done as part of a home inspection or as a separate service, the test must be performed in closed-house conditions. This means that all windows and exterior doors should be shut, except for those being used for normal entry and exit. Additionally, the radon testing device should be placed at the lowest level of the building, such as the basement.
Some radon testing devices are short-term, meaning they take about two days to collect a sample of air and then send it off for analysis. This kind of test is cheaper than long-term tests, which can take up to a year to gather a sample and send it for analysis. However, short-term radon tests are not as accurate as their longer counterparts, so the result should be taken with caution. Long-term radon monitors are more expensive but offer more reliable and comprehensive results.